Top
Enabling Power Feeding
- Go to System/Hardware.
- From the BRI Cards Configuration table, from the Power Feeding drop down list, select Enable.
- Click Apply.

Top
Selecting the Source of the Clock Reference
- Go to System/Hardware.
- From the Clock Reference Configuration table, select from the Suggestion list, several clock reference sources.
- Click Apply.

Top
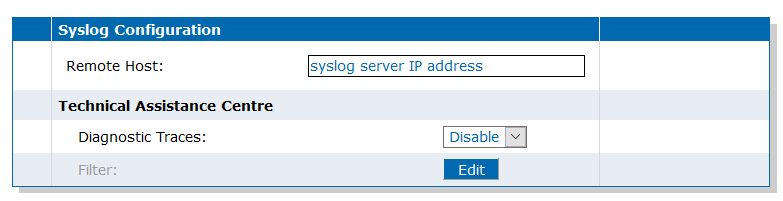
Configuring the Syslog Server
Top
Enabling Diagnostic Traces
- Go to System/Syslog.
- In the Technical Assistance Center section (bottom of page), from the selection list located next to Diagnostic Traces, select Enable.

Top
Configuring the Default Network Gateway to a Static IP Address
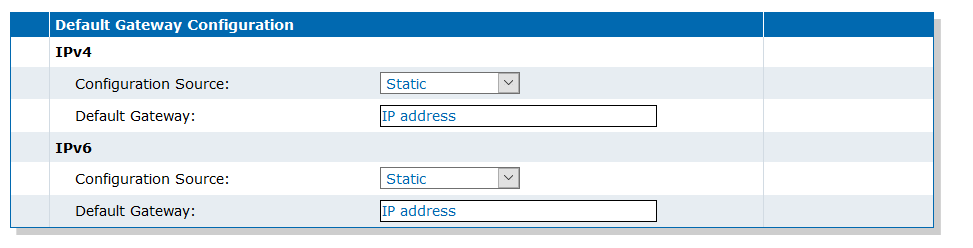
- Go to Network/Host.
- In the Default Gateway Configuration table, from the IPv4/Configuration Source selection list, select Static.
- In the IPv4/Default Gateway field, enter the IP address used as the Static Default Router for the Uplink Network Interface.
- In the Default Gateway Configuration table, from the IPv6/Configuration Source selection list, select Static.
- In the IPv6/Default Gateway field, enter the IP address used as the Static Default Router for the Uplink Network Interface.
- Click Apply.
Top
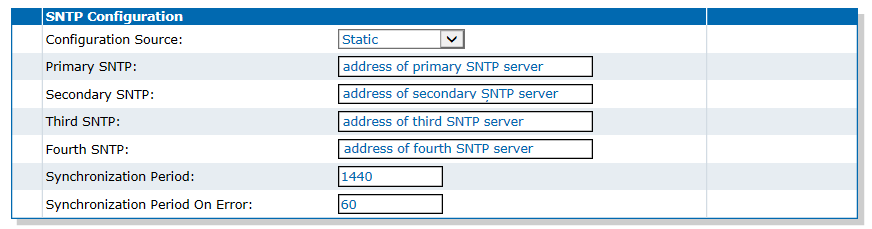
Configuring the SNTP Server to a Static IP Address
Top
Configuring the Domain Name Server (DNS)
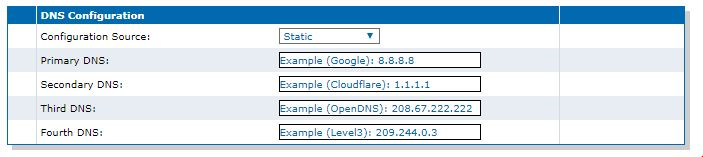
- Go to Network/Host.
- In the DNS Configuration table, form the Configuration Source selection list, select Static.
- For each DNS used, enter the IP address of the DNS.
- Click Apply.
Top
Configuring a Network Interface
Top
Configuring the BRI Interface
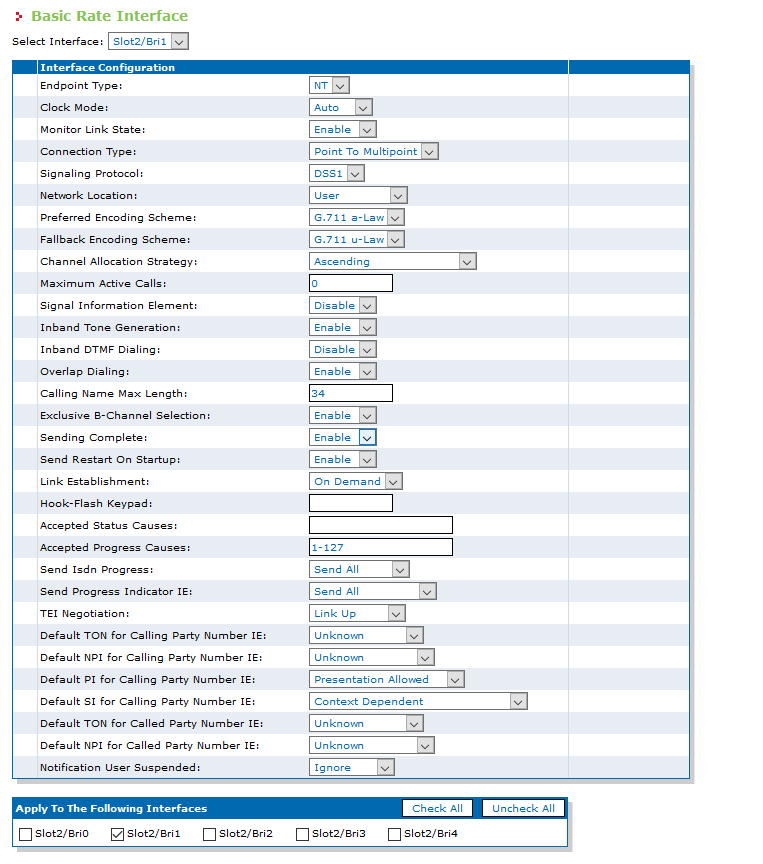
- Go to ISDN/Basic Rate Interface.
- From the Select Interface dropbox, select Bri1
- In the Interface Configuration table, set Endpoint Type to NT.
- Set Connection Type to Point to Multipoint.
- Set Inband DTMF Dialing to Enable.
- Set Exclusive B-Channel Selection to Enable.
- Set the Send Restart On Startup.
- Leave all the other parameters to their default values.
- From the Apply To The Following Interfaces select the interfaces for which the configuration will be applied to.
- Click Apply.
Top
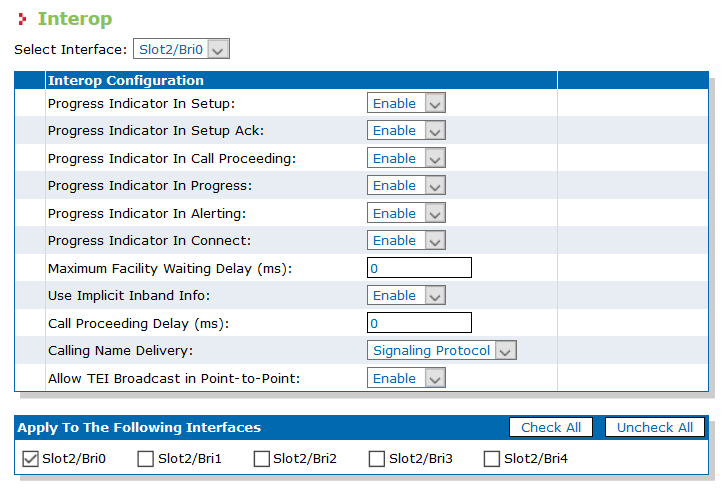
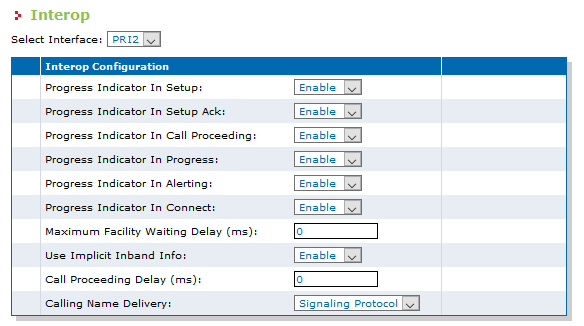
Configuring Interoperability
Top
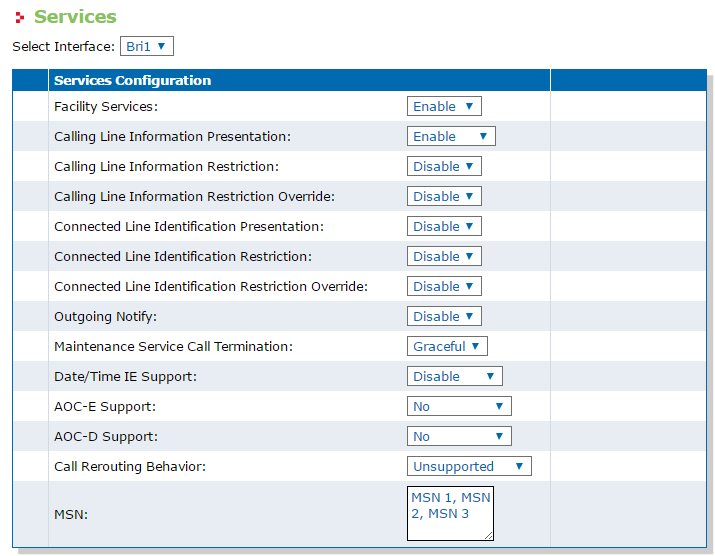
Enabling Calling Line Information Presentation
Support of ISDN FACILITY messages will be enabled.
Top
Registering Endpoints to All Gateways

Top
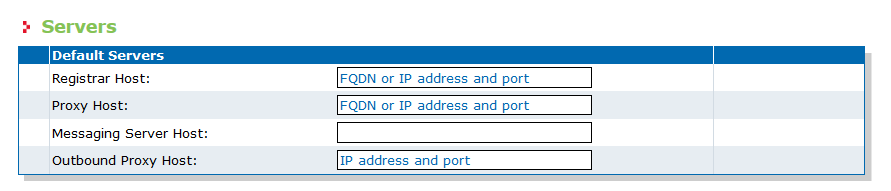
Configuring Default SIP Servers
Top
Configuring Endpoint Authentication
- Go to SIP/Authentication.
- Click Edit All Entries located at the bottom of the page.
- In the Authentication table, from the Criteria selection list, select Endpoint for all endpoints needing registration.
- From the Endpoint selection list, select the related FXS port for each entry.
- From the Realm field, enter the provided realm and from the Validate Realm selection list, select Enable. If no Realm was provided, leave the field empty and from the Validate Realm selection list, select Disable.
- In the User Name field, enter the SIP user name for each entry.
- In the Password field, enter the appropriate password for each entry.
- Click Apply and Refresh Registration.

Top
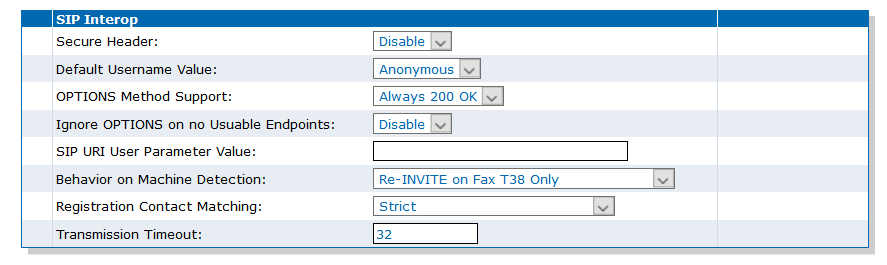
Configuring OPTIONS Method Support
- Go to SIP/Interop.
- In the SIP Interop table, from the OPTIONS Method Support selection list, select Always 200 OK.
- Click Apply.
Top
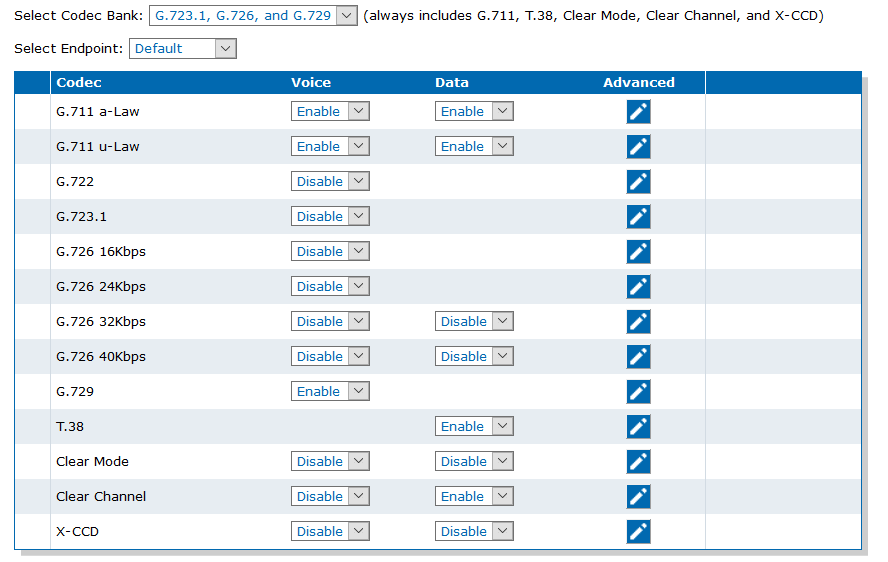
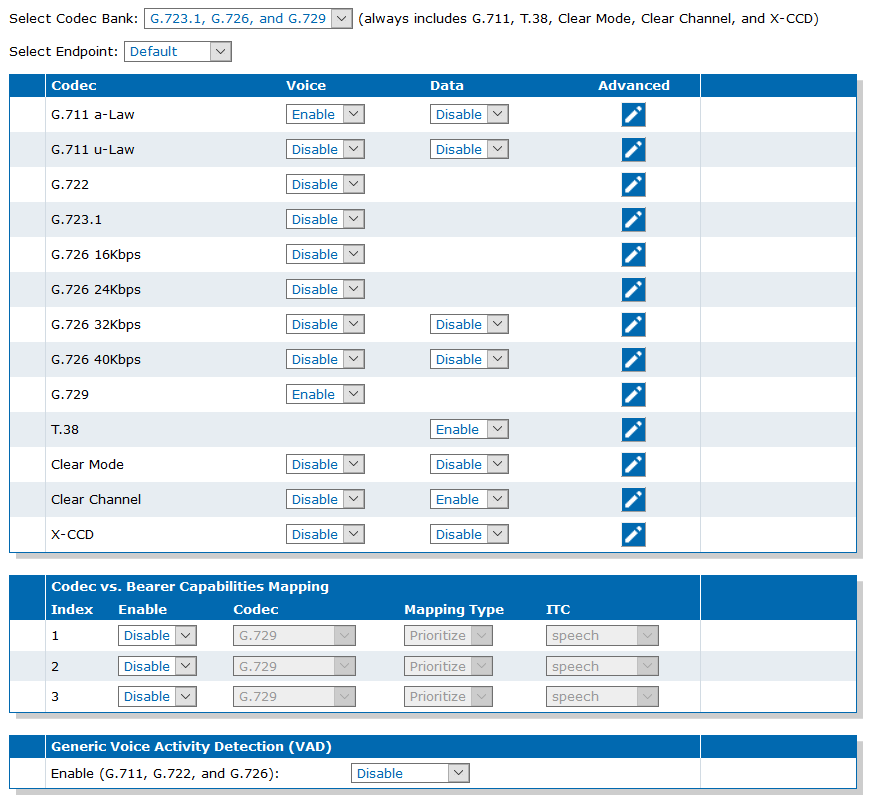
Enabling Default Codecs
-
Click
 for Advanced codec settings.
Note:When enabling two codecs or more, the priority order can be modified by selecting the advanced options.
for Advanced codec settings.
Note:When enabling two codecs or more, the priority order can be modified by selecting the advanced options.
Top
Configuring DTMF Transport
- Go to Media/Misc.
-
In the DTMF Transport
table, set the Transport Method to the one
set in the VoIP server.
- In-band
- Out-of-Band using RTP (RFC2833). This is usually the preferred method. Remember to set the payload type if different (e.g.: 96, 101 or 110 in some cases).
- Out-of-Band using SIP. For Cisco or Avaya systems, from the SIP Transport Method field, use Info DTMF Relay. For legacy Nortel and others, leave Draft Choudhuri SIP Info Digit 00.
- Signaling Protocol Dependent: choose this method if unsure. It will try to use the method negotiated by the VoIP server.
- Click Apply.

Top
Enabling the Payload Type Found in the Answer
You cannot access this parameter from the DGW Web page, you must use the Command Line Interface (CLI).
Top
Adding the * Star Code Dial Map

Top
Adding the # Key Dial Map

Top
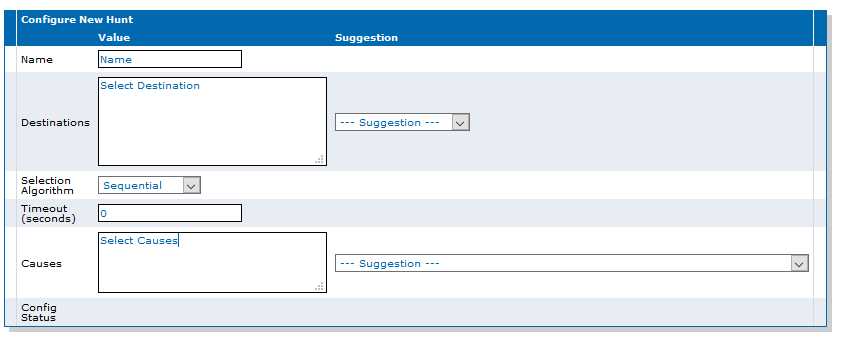
Creating a Hunt
-
In the Hunt table,
- click
 located on the same row as an existing hunt to
add a new hunt above or,
located on the same row as an existing hunt to
add a new hunt above or, - click located at the bottom of the table to add a hunt
at the end of the table.
Note:You can create up to 40 hunts. - click
Top
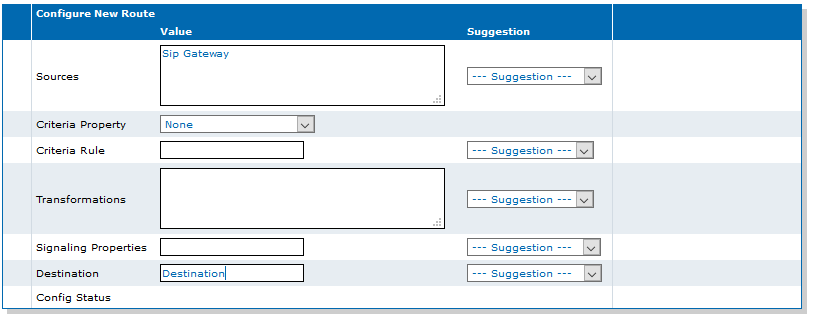
Creating a Route from a SIP Gateway to a Destination
-
In the Routes table,
click .
- click located on the same row as an existing route to
add a new route above or,
- click located at the bottom of the table to add a
route at the end of the table.
Note:A maximum of 40 routes can be created. - click
Top
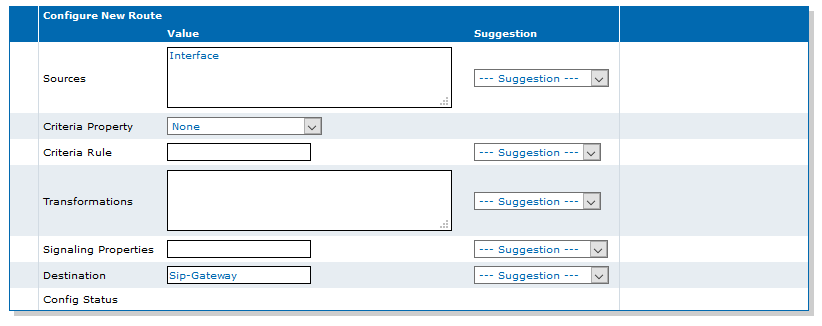
Creating a Route from a Physical Interface to a SIP Destination
-
In the Routes table,
click .
Top
Restarting Services
- Go to System/Services.
- In the restart required services table, click restart required services.
Top
Online Help
If you are not familiar with the meaning of the fields and buttons, click Show Help, located at the upper right corner of the Web page. When activated, the fields and buttons that offer online help will change to green and if you hover over them, the description will bedisplayed.
Top
DGW Documentation
Mediatrix devices are supplied with an exhaustive set of documentation.
Mediatrix user documentation is available on the Media5 Documentation Portal.
- Release notes: Generated at each GA release, this document includes the known and solved issues of the software. It also outlines the changes and the new features the release includes.
- Configuration notes: These documents are created to facilitate the configuration of a specific use case. They address a configuration aspect we consider that most users will need to perform. However, in some cases, a configuration note is created after receiving a question from a customer. They provide standard step-by-step procedures detailing the values of the parameters to use. They provide a means of validation and present some conceptual information. The configuration notes are specifically created to guide the user through an aspect of the configuration.
- Technical bulletins: These documents are created to facilitate the configuration of a specific technical action, such as performing a firmware upgrade.
- Hardware installation guide: They provide the detailed procedure on how to safely and adequately install the unit. It provides information on card installation, cable connections, and how to access for the first time the Management interface.
- User guide: The user guide explains how to customise to your needs the configuration of the unit. Although this document is task oriented, it provides conceptual information to help the user understand the purpose and impact of each task. The User Guide will provide information such as where and how TR-069 can be configured in the Management Interface, how to set firewalls, or how to use the CLI to configure parameters that are not available in the Management Interface.
- Reference guide: This exhaustive document has been created for advanced users. It includes a description of all the parameters used by all the services of the Mediatrix units. You will find, for example, scripts to configure a specific parameter, notification messages sent by a service, or an action description used to create Rulesets. This document includes reference information such as a dictionary, and it does not include any step-by-step procedures.
Top
Copyright Notice
Copyright © 2026 Media5 Corporation.
This document contains information that is proprietary to Media5 Corporation.
Media5 Corporation reserves all rights to this document as well as to the Intellectual Property of the document and the technology and know-how that it includes and represents.
This publication cannot be reproduced, neither in whole nor in part, in any form whatsoever, without written prior approval by Media5 Corporation.
Media5 Corporation reserves the right to revise this publication and make changes at any time and without the obligation to notify any person and/or entity of such revisions and/or changes.